Open topic with navigation
Manually Inspecting Plates
You can use Rock Imager's powerful optics to explore the contents of your plates at any time using the manual imaging controls.
Prerequisites
- You have loaded the plate to Rock Imager, scanned the barcode, and moved the plate to the desired imager (e.g. Visible, UV, FRAP, SONICC).
Note: If you are using Rock Imager 2 or FRAP, you can inspect plates without scanning barcodes.
To Manually Inspect a Plate:
- Before you can use any of the manual imaging controls, you have to put Rock Imager into Manual Mode. To do so, go to the Scheduling menu and select Manual Mode. A dialog box opens.
- Rock Imager asks you if it should automatically revert to scheduled imaging, or if you want to stay in manual mode indefinitely.
- If you opt to stay in manual mode, you will need to go to the Scheduling menu again later and select Automatic Mode in order for Rock Imager to continue with the imaging schedule.
- If you select Automatically, you'll need to enter the number of minutes in the appropriate field.
- Click OK.
- If you're not already on the Live Image tab, go to the Imager tab and click the Live Image sub-tab.
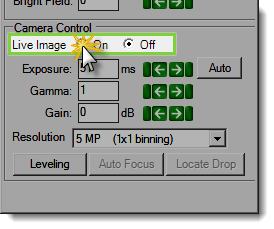
- Under Camera Control, set Live Image to On by the Live Image button.

Set Live Image to On
- Use the Well Controls to explore the contents of your plate.
- Use the Optics Controls and Camera Controls to fine-tune the live image.
Important: Leaving Live Image on for an extended period of time may cause thermal decomposition to samples.
Tip: To save a picture of a live image, go to the File menu and select Save As.
To Manually Inspect a Plate with Rock Imager 2 and FRAP:
- In the Plate Control column, click Load Plate Type.

Plate Control
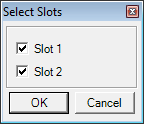
- Select which "slot" to inspect, then click OK. The window to define experiment for the plate on the slot 1 opens.

Select slot
- Select your plate type from the Plate Type menu.
- Name your experiment.
- Click OK. If you are selecting slot 1 and slot 2, you have to define the Plate Type and name your experiment for a plate at slot 2.
- Under Camera Control, set Live Image to On by clicking the Live Image button.

Set Live Image to On
- Use the Well Controls to explore the contents of your plate.
- Use the Optics Controls and Camera Controls to fine-tune the live image.
Important: Leaving Live Image on for an extended period of time may cause thermal decomposition to samples.
Tip: To save a picture of a live image, go to the File menu and select Save As.
Related Topics
|
|

|
| RIC-V216R216
|
|


